

When you need to send emails with sensitive information in Outlook, you might want to encrypt it. Encrypted emails send from Outlook or Office 365 can only be read by the recipient that has the private key, preventing others from reading the content of the mail. It also can protect your email from being forwarded.
If you have Office 365 then sending encrypted mail is really easy. You can do this without installing any certificates from both Outlook as Outlook Online to any recipient (Gmail, iCloud, Outlook).
Other options to secure your email in Outlook are to use Cerficiates or a third-party add-in for Outlook.
In this article, we are going to take a look at the different options, how to use them and what the pros and cons are from each of them.
Email Encryption Options
As mentioned in the beginning there are three ways to basically secure your email from Outlook. Each of them has there own advantages, but some are harder to set up. We have the following options when it comes to email encryption:
- Office 365 Message Encryption – Part of Office 365. Easy to use, does not require to install certificates. You can send emails to any email client. Requires a couple of handlings to open the email when not using Outlook though.
- Certificate-based Encryption – Both sender and recipient need to have public certificates to encrypt and decrypt the email. Harder to install, but in the end easier to use if you are sending a lot of encrypted emails.
- Outlook Add-ins – If you don’t have Office 365 then you can easily send encrypted emails using a third-party add-in.
Office 365 Encrypted Email
Microsoft Office 365 Message Encryption (OME) allows you to easily send encrypted emails to your recipient. The advantage of OME is that you and the recipient don’t need to install any certificate to encrypt or open the email.
When you send an email with Office 365 Message Encryption, the recipient receives an email with only the subject. Depending on the mail client of the recipients, they can either simply open the email (verification is done in the background) or the recipient can read the email and attachments in an online environment after an extra verification step.
You will need to send the email from Outlook or Outlook Online, but the recipient doesn’t need to have Outlook or an Office 365 subscription. Encrypted emails can be opened with any email client.
To use Office 365 Message Encryption you will need to have one the following Microsoft 365 Plans:
- Microsoft 365 Personal or Family
- Office 365 Enterprise E3 or E5
- Microsoft 365 Enterprise E3 or E5
- Microsoft 365 Business Premium
- Office 365 A1, A3, or A5
How-to Send Encrypted Email Outlook
To send an encrypted email from Outlook you don’t need to set up anything. You can simply compose a new email and encrypt it:
- Compose a new emailOpen Outlook and compose a new email. Simply add the recipient, subject, and body. You can also add attachments to the email, just like you normally do:
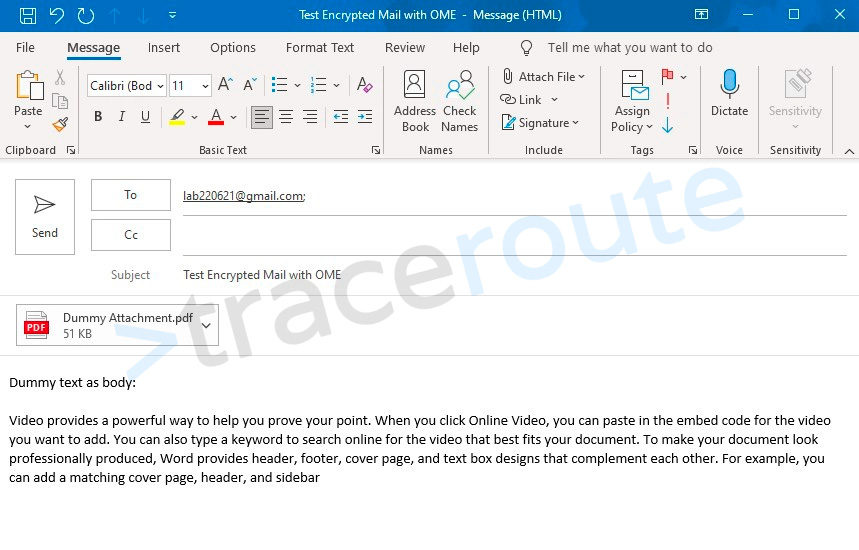
2. Encrypt Email
The next step is to encrypt the email:
– Select Options
– Click on Encrypt
You can also select other options under encrypt which I will explain later.
It’s possible to move the Encrypt button to the first tab “Message”. This will save you one extra click to encrypt emails.

3. Send the email
After you have applied the encryption you will see a small note above the address fields that the email is encrypted.
Click on Send to send the email to the recipient(s).

4. Opening the Encrypted Email in Outlook
If the recipient is using Outlook then they receive the secure email with the original subject and a lock icon.
Outlook will verify the recipient in the background after you double-click on the email. It will then open just like a normal email.

Opening a Secure Email in other Mail Clients
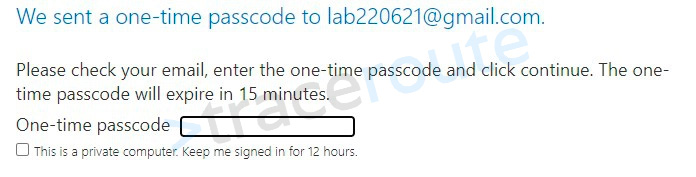
The recipient does not need to have Outlook or Office 365 to open the encrypted email. When you send a secure email to Gmail for example the recipient will see only the subject and a button to the read the message.

When you click on Read the message you will be sent to Outlook Online where you need to verify your account. Depending on the client, this can be done with a One-time passcode which will be sent to the intended recipient or by signing with the identity provider of your mail client (Gmail, Yahoo ID, Personal Microsoft Account)

After verification, you can read the email and attachment in the Outlook Online environment. The recipient can reply or forward (when allowed) the email while keeping the encryption in place.

Send Encrypted Email from Office 365
Office 365 secure emails can be send using Outlook Online. The principal and technique are the same as with Outlook, only the menu looks a bit different.
- Compose a new email in Outlook Online
- Select Encrypt in the toolbar
- Click Change Permissions if you also want to prevent forwarding of the email
- Click Send when done.

If you don’t see the encrypt button, then click on the 3 dots. You can also add the encrypt button to the bottom toolbar:
- Select the gear icon and choose All Outlook Settings
- Select Mail
- Choose Customize Actions
- Enable Encrypt.

Prevent forwarding of emails in Outlook
You can not only encrypt emails in Outlook but also prevent them from being forwarded. This way you can ensure that the email will on be read by the person you have to send it to.
When you apply the encryption on a new message in Outlook you get a couple of options:
- Encrypt
- Do Not Forward
- Confidential
- Highly Confidential
When selecting Do Not Forward the email will be encrypted and can’t be forwarded, printed, and you can’t copy the content. This way you can be sure that only the intended recipient can read the content of the email.
Move the Encrypt button in Outlook
A small tip that will make encrypting messages a little bit easier in Outlook is to move the encrypt button from the Options tab to the Message tab. This way, when you are typing a new email, you can encrypt it with one click.

- Open a new mail
- Right-click on the toolbar
- Choose Customize the ribbon
- Expand Options in the right column
- Select Encrypt
- Use the up arrow to move it to New Mail Message

Remove encryption from send emails
In Outlook it is possible to remove the encryption of the email after you have sent it. After you have removed the encryption recipient can read the email without verification.
- Go to your send items in Outlook
- Open the encrypted mail that you have sent
- Select File and select Unrestricted Access under Encrypt.

Office 365 Message Encryption Branding
With the help of PowerShell, you can apply custom branding to OME messages. Custom branding helps your recipient with regonizing your emails and makes them more trustworty.
We can customize the following items in both the email and online portal:

- Add a logo
- Background and button color
- Introduction text
- Button Text
- Description text
- Disclaimer
To customize the template you will need to have the Exchange Online module installed for PowerShell. Also, we need to know the name of the current template that is being used. Most likely it is “OME Configuration”
We are first going to check the current configuration:
1.  # Connect to Exchange Online<font></font>
2.  Connect-ExchangeOnline -UserPrincipalName yourname@contoso.com<font></font>
3.  <font></font>
4.  # Get the current configuation<font></font>
5.  Get-OMEConfiguration | fl
Adding a logo and background color
You can add your company logo to the OME message and portal. The optimal size of the logo is 170×70 pixels, less than 40KB and supported formats are png, jpg, BMP, and tiff. Transparency is supported with png.
The Identity is name of the default template that we have just looked up. You can upload the image with Get-Content from any location on your computer.
1.  # Set your own logo<font></font>
2.  Set-OMEConfiguration -Identity "OME Configuration" -Image (Get-Content "C:\temp\Logo-LazyAdmin.png" -Encoding byte)
To change the background color you can use any RGB color in a hexadecimal format. The button will have the same color as the background.
1.  # Change the background color<font></font>
2.  Set-OMEConfiguration -Identity "OME Configuration" -BackgroundColor "#343e47"
Changing the text items
There are a couple of text items that you can change. By default you will see the senders name (and email address) followed by the line “has sent you a protected message”. You can change this with the following cmdlet:
1.  # Change introduction line<font></font>
2.  Set-OMEConfiguration -Identity "OME Configuration" -IntroductionText "has send you an encrypted message"
The button text can be changed as followed, but don’t make the text to long, because it will mess up the layout of the button.
1.  # Change read message button<font></font>
2.  Set-OMEConfiguration -Identity "OME Configuration" -ReadButtonText "Open Message"
And the text below the button
1.  # Text below the button<font></font>
2.  Set-OMEConfiguration -Identity "OME Configuration" -EmailText "This Encrypted message was sent to you by LazyAdmin"
You can also add you own disclaimer and privacy link to the message:
1.  # Privacy Statement URL<font></font>
2.  Set-OMEConfiguration -Identity "OME Configuration" -PrivacyStatementUrl "https://lazyadmin.nl"<font></font>
3.  <font></font>
4.  # Disclaimer<font></font>
5.  Set-OMEConfiguration -Identity "OME Configuration" -DisclaimerText "This encrypted message is confidential for the use of the addressee only. Do not decrypted if you are not the addressee"
We can also add the text line to the portal, where the recipient can read the mail. You can add instruction here for example.
1. Set-OMEConfiguration -Identity "OME Configuration" -PortalText "This highly secure email is brought to you by LazyAdmin"
Change verification options
By default, the recipient can authenticate with a one-time passcode or identity provider like Microsoft, Google, or Yahoo. It’s possible to disable this, but keep in mind that you will need to use one of the two options. You can’t disable them both.
1.  # Disable identity providers<font></font>
2.  Set-OMEConfiguration -Identity "OME Configuration" -SocialIdSignIn $false<font></font>
3.  <font></font>
4.  # Disable One-time password<font></font>
5.  Set-OMEConfiguration -Identity "OME Configuration" -OTPEnabled $false

Encrypting mail using Certificates
Emails that you send can also be encrypted with certificates. The advantage of certificates is that you can open the mail normally. But there is one huge downside of using certificates, your recipient also needs to have its own certificate.
The initial setup is pretty hard, both parties need to buy a certificate online, which costs between $30 and $250 per year depending on your requirements. You will need to add the certificate to your Outlook and first send each other a signed email.
With the signed email you automatically receive the public key of the other. This allows you to encrypt the mail with the public key of the recipient, which then can only be decrypted on a computer that has the matching certificate installed.
If you want to read the encrypted email on your phone, then you first need to install the certificate on your phone as well. The same goes for Outlook Online.
Certificates are really secure once properly installed but are not really user-friendly. The certificate basically allows you to receive encrypted mail because your recipient needs to have a certificate before you can send an encrypted email.
This process is only recommended when your business really requires it.
Using third-party add-in for sending secure mails
If you don’t have an Office 365 subscription then you can also use a third-party add-in for Outlook. These add-ins work pretty much on the same principle as the Office 365 Message Encryption service, with the only difference that the mail is always sent to their online mailbox.
Encyro offers a plugin that you can use for free to send encrypted messages to any email address. You can use the online portal or the Outlook add-in to compose and send secure mail.


Installation is pretty straight forward and only the sender needs to have the Encyro account to starting to send encrypted emails. The recipient receives, just like with OME, a link to the secure message.
Only who is opening the link isn’t verified by default, so anybody that has access to the link can open the encrypted mail. The link itself however is only valid for a couple of days, so that makes it a bit more secure.
The advantage of this method is that the recipient doesn’t need to perform multiple steps to open the encrypted mail. You can also require that the recipient also create a free Encyro account, forcing them to log in before opening the mail.
Wrapping Up
There are multiple ways to encrypt email in Outlook. The most convenient one is using Office 365 message encryption if that is part of your licenses. Add-ins can be useful, but if you have Office 365 it might be easier and cheaper to upgrade your license plan.
Using certificates to encrypt email is only useful if you are sending a lot of secure emails to a selected group of recipients. Keep in mind that all parties need to have their own certificate.